

Wednesday, October 30, 2013
Monday, October 21, 2013
MMGM: Judy Moody and the Bad Luck Charm

Judy Moody and the Bad Luck Charm is a lower middle grade book for children ages 6-9. It is the eleventh book in the series.
Book Description (from Amazon) - The lucky penny in Judy Moody’s pocket sure does seem to be working. She can’t stop winning — at bowling, spelling, the unbeatable Prize Claw, everything! For sure and absolute positive, she’ll ride that wave of good fortune all the way to Washington, D.C. Watch out, District of Cool, here comes Judy Moody, the luckiest kid ever, until . . . oh, no! Her lucky penny just did a belly flop into a porcelain bowl of yucky, blucky UNluck. Has the coin’s magic gone kerflooey?Are some people, like Jessica Finch or Stink, destined to have all the luck, while she, Judy Moody, gets stuck with a yard full of three-not-four leaf clovers, a squealing potbellied pig in an elevator, and a squashed penny with cooties? ROAR!
Why it is Marvelous - Judy is just such a cute and funny character and I absolutely adore the pictures in this series. For fans of Judy Moody this book will hit the spot. She is funny (dare I say "charm"ing) and even when things don't go exactly how she planned, Judy seems to have a way of making everything an adventure. The only thing I missed in this book was her cast of friends, as most of this story takes place in Washington D.C. The one classmate who is there with her is not a close friend, but will the good luck/bad luck charm push them farther apart or closer together?
-------------------------------------------------------------------------------------------------
 Marvelous Middle Grade Monday (MMGM) was created by Shannon Messenger. To find other bloggers participating in MMGM go to her blog for a list of links.
Friday, October 18, 2013
Angel Earrings - Getting Crafty and a Donation
I saw this project in the weekly ad from my local craft store last December and put it to the side. I finally got around to making the cute earrings as a birthday present for my daughter in February. With the holidays coming up (again!) I thought I would post this project as something easy (but classy) you can make for someone you love.

With bead projects you often have to buy a bunch of the same beads/accessories to make just one project, so I had a lot of supplies left over. Soon after my daughter's birthday I heard news that an acquaintance had lost a baby late in her pregnancy. I got to thinking about that little angel baby and it brought me back to these earrings. I decided to make her a pair, but as a necklace instead, with one attached to the necklace and one she could slip off and place with the baby when they buried him. I passed this along to her through a mutual friend and have hoped that it brought her a small measure of peace.
Another mutual friend saw her necklace and (after a little asking around) came to me to ask if I could make some more and donate them to her ministry called Aaron's Project. She makes baskets for women who have lost babies, filled with items to help the woman/family through their loss. I was touched that she thought it would be something she would like to include and have now made some to pass on to her.

Not having done beading before, these were relatively easy to make. The only tricky part was getting the loop just right, using needle nose pliers. I used a pair of craft pliers from a Stampin' Up tool set. If you are making the set on the necklace then you need to remember to make the loop big enough (on the one that will be removed) to fit over the clasp at the back of the neck.
Here is what you will need to make these for yourself or someone you hold close to your heart!
Tierra Cast Angle Wings (15 mm)
Swarovski Tear Drop Crystal Beads (9x6mm faceted)
Crystal Bead for the angel head (mine is 5mm, which was a hard size to find)
Beading Headpins
4mm Rhinestone Halos (these didn't have a brand name - purchased at Craft Warehouse)
Connector (for a pendant style necklace - I found this one at Michaels)
or
Earring Wires (lots of different styles here - I made sure they were sterling silver for my daughter)
Chain/Necklace (the lady at Craft Warehouse measured and added the clasps for me)
Beading/Craft Pliers - to make a loop at the end of the headpin after adding the beads
Let me know if you have any questions!
Thursday, October 17, 2013
My Journey in Scrapbooking
I have been scrapbooking since I was a teenager, taking photos, cutting
up photos, journaling, and (at that time) putting it all in those awful albums with
the peel back magnetic pages. (You all know those are harmful to your photos, right?) I kept newspaper articles on myself and my
friends, ticket stubs and other memorabilia.
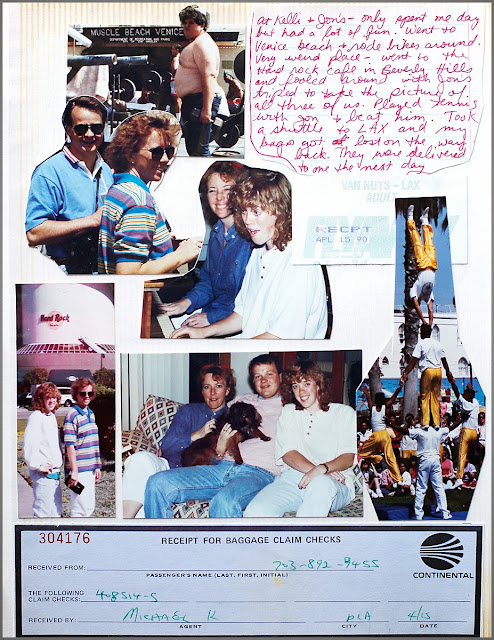
Here is an example of my scrapbooking from that time. Not much technique going on here, using what was available to me: apparently scissors, ruled notebook paper and a red pen. I also didn't take much care in my penmanship, which is weird because I am pretty picky about that now. I would have also composed my shot of Muscle Beach Venice a little better... uh, to include some muscles!
To say memory keeping has evolved a little bit since then is an understatement! I found a company called Creative Memories at a craft fair in 1996 and attended a class at the consultant’s house… even got my husband to tag along and help with making the page. I love my Creative Memories albums and especially liked the concept of purchasing products in the same style/line to keep my options limited. Scrapbooking can be overwhelming and when I have too many choices I often end up not making a choice at all. I was just in Hobby Lobby yesterday and couldn't believe the amount of paper they had. My style in my Creative Memories albums has always been simple, usually opting for solid color papers, a simple title, journaling and a few (if any) embellishments. I also like my albums to lay flat so I never got into using any fancy supplies like brads and eyelets, twine, and really anything that would make my page bumpy.
Here are a few of my pages from my Creative Memories albums.
This is one of the first pages I made, very simple and just a few captions.

Here I am rocking the hand-lettering. Before I started using alphabet stickers I made most of my titles by hand, which is really kind of fun. Now is it just me, or does the design in the letter "W" look like a pair of boobs? I'm sure that was not my intention.

And here is another early layout where I copied a fun border I saw in a Creative Memories catalog. And... another hand drawn title.

I thought I would always use paper products, but kept getting farther behind with my pages, not having a dedicated space to scrap and once the kids came along, not wanting them to get into all the supplies. In early 2009, I downloaded some digital products being talked about on a photography site and started to play. I was already familiar with Photoshop and while it did take time to figure it all out, once I did I was hooked. No more cropping a photo and then having to run out and get another because I didn’t like the crop. No more redoing my journaling because I made a mistake. No more forgetting a set of photos and not being able to fit them in chronologically. I could use all the brads and twine and staples I wanted and my pages would still be flat! And no more paper cuts!

And here is a page I made for Project Life. The plan was to make a double-page spread for each week of the year. I finished nine weeks and petered out. I am hoping to revive the project for 2014 (in some way, shape or form) because every time I go back and reread the small details of our everyday life, I smile. Little things I recorded for the project that I would never have remembered otherwise. Like my son going through a phase of running up to the big Pepperidge Farm goldfish every time we saw one in the grocery store and giving it a hug and kiss.

So if you read through all that then I think you can tell I have been involved in scrapbooking for a while and am pretty passionate about getting pictures off the camera/iPhone (or out of the drawers) and documented in a place that will tell my family's story. Let me know if you have any questions!
Here is an example of my scrapbooking from that time. Not much technique going on here, using what was available to me: apparently scissors, ruled notebook paper and a red pen. I also didn't take much care in my penmanship, which is weird because I am pretty picky about that now. I would have also composed my shot of Muscle Beach Venice a little better... uh, to include some muscles!

To say memory keeping has evolved a little bit since then is an understatement! I found a company called Creative Memories at a craft fair in 1996 and attended a class at the consultant’s house… even got my husband to tag along and help with making the page. I love my Creative Memories albums and especially liked the concept of purchasing products in the same style/line to keep my options limited. Scrapbooking can be overwhelming and when I have too many choices I often end up not making a choice at all. I was just in Hobby Lobby yesterday and couldn't believe the amount of paper they had. My style in my Creative Memories albums has always been simple, usually opting for solid color papers, a simple title, journaling and a few (if any) embellishments. I also like my albums to lay flat so I never got into using any fancy supplies like brads and eyelets, twine, and really anything that would make my page bumpy.
Here are a few of my pages from my Creative Memories albums.
This is one of the first pages I made, very simple and just a few captions.


I thought I would always use paper products, but kept getting farther behind with my pages, not having a dedicated space to scrap and once the kids came along, not wanting them to get into all the supplies. In early 2009, I downloaded some digital products being talked about on a photography site and started to play. I was already familiar with Photoshop and while it did take time to figure it all out, once I did I was hooked. No more cropping a photo and then having to run out and get another because I didn’t like the crop. No more redoing my journaling because I made a mistake. No more forgetting a set of photos and not being able to fit them in chronologically. I could use all the brads and twine and staples I wanted and my pages would still be flat! And no more paper cuts!
When I started searching the internet I was amazed at how many digital products are out there. Since I was just testing the waters I searched for any and all free
downloads I could find – and there are a lot. I landed on a site called
Designer Digitals and they had some awesome freebies – three every week! When I
poked around and looked at the gallery and forums I decided this was the place
for me and have made it my digital scrapbooking home. I was thrilled beyond
belief when Katie Pertiet (owner with her husband Randy Pertiet) asked me to
join their Creative Team in the fall of 2009. I have made well over 500 pages since then and find that this is a great way to combine my love of photography and being creative, with the added bonus of having our family history recorded and ready to pass down to future generations.
Here is one of my favorite digital layouts. For the most part I try to keep my layouts simple (doesn't always work) focusing on the photos and jouraling.

And here is a page I made for Project Life. The plan was to make a double-page spread for each week of the year. I finished nine weeks and petered out. I am hoping to revive the project for 2014 (in some way, shape or form) because every time I go back and reread the small details of our everyday life, I smile. Little things I recorded for the project that I would never have remembered otherwise. Like my son going through a phase of running up to the big Pepperidge Farm goldfish every time we saw one in the grocery store and giving it a hug and kiss.

So if you read through all that then I think you can tell I have been involved in scrapbooking for a while and am pretty passionate about getting pictures off the camera/iPhone (or out of the drawers) and documented in a place that will tell my family's story. Let me know if you have any questions!
Monday, October 14, 2013
Miscellaneous Monday
OK, I just stole the title of this post from Barbara Watson, but it is perfect for what I am blogging about today. Since I have been quite the slacker in blogging about writing-related topics I have decided to expand my blog to include all things created by me. I love all my hobbies (and yes, until I change my mindset and become more serious, writing falls into that category) and seem to go in spurts. Well, except for scrapbooking. That is an all-the-time hobby. When the weather turns colder I pull out my knitting needles, with big plans to knit everyone I know something for Christmas. When I see a cool project in the local craft store flyer, I run out and get the supplies and am hot on that for a while. When I get on a reading streak I can read multiple books each week. Every so often I get an itch to make a quilt.
So hopefully there will be something of interest to anyone who stops by. I added a few blinkies to my sidebar and added a tab at the top that details my published creative work.
For today I thought I would show you the latest scrapbook page I completed. I use an all-digital format which I will explain more in a later post.

This layout was designed using all Designer Digitals products.
The other creative thing shown here is the hat. I found this pattern and thought it would be good for my son. He approved and we took a trip to the yarn store so he could help choose the type and color of yarn. I am very happy to report that he was pleased with the results and I am looking forward to seeing him wear it this coming season. Click here for a link to where I posted this project on Ravelry.
Thanks for stopping by today and I hope you come back and see me again!
Subscribe to:
Posts (Atom)